[Java 파헤쳐보기] Java의 바이트 코드 눈으로 확인해보기
지난 포스팅에서 소스코드를 자바 컴파일러가 바이트코드로 변환하는 것을 다루어보았다.
그럼 Java의 바이트 코드가 어떻게 생겼는지 직접 생성하고 확인해보자
public class bytecode {
    public static void main(String[] args) {
        String name = "정동교";
        int age = 20;
        Person me = new Person(name, age);
        System.out.println(me.getInfo());
    }
}

class Person{
    String name;
    int age;
    Person(String name, int age) {
        this.name = name;
        this.age = age;
    }
    String getInfo() {
        return("이름은 " + name + ", 나이는 " + age);
    }
}
이런 간단한 코드를 생성해보았다. 이제 컴파일해보자.

파일을 컴파일하면, 2개의 클래스를 생성했기 때문에 두 개의 클래스파일이 생성된다.
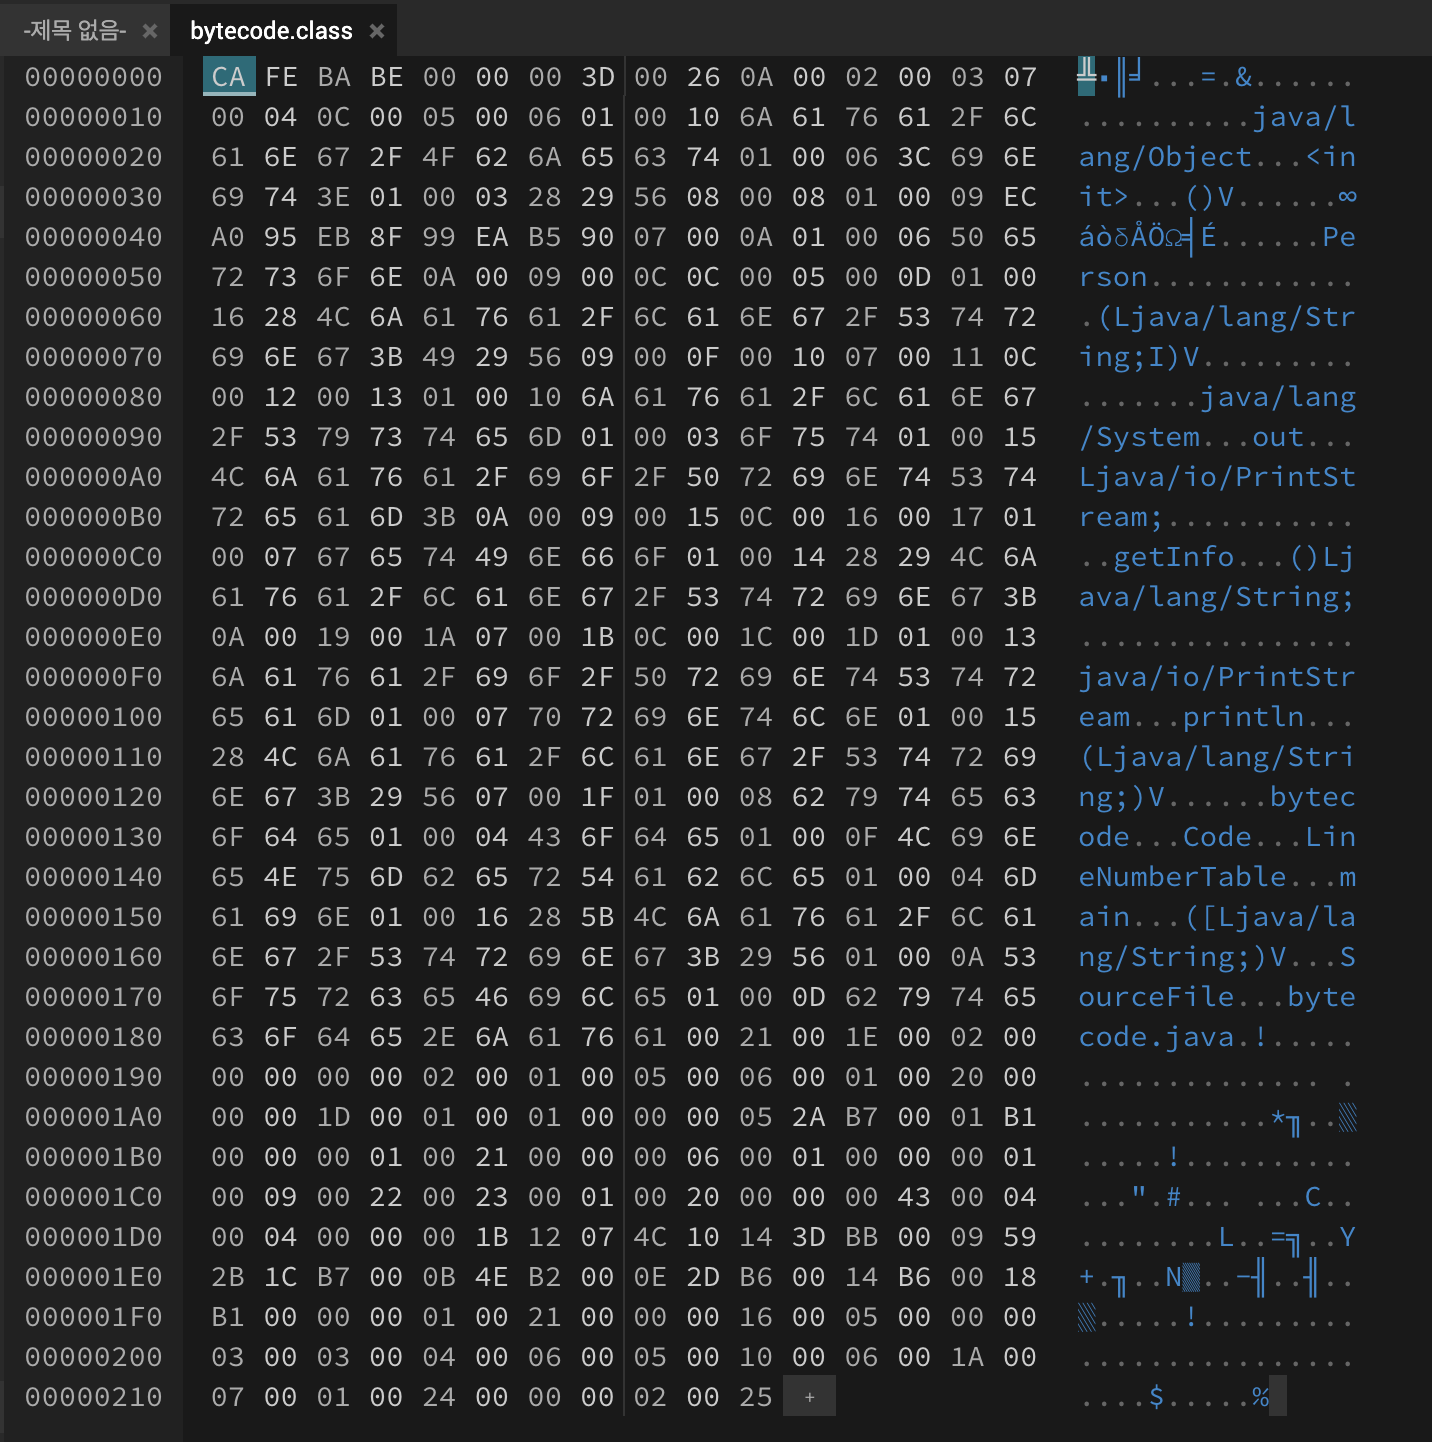
그리고 이것을 HexEditor로 열어보면 위와 같다. 정신이 아득해지니 그냥 넘기자.
이걸 쉽게 보기 위해서는 아래 명령어를 실행하면 된다. javap 는 java class file disassembler 이다.
javap -v -p -s bytecode.class
그럼 아래처럼 바이트 코드를 확인할 수 있다.
Classfile /Users/jeongdong-gyo/Desktop/bytecode/bytecode.class
  Last modified 2024. 9. 7.; size 539 bytes
  SHA-256 checksum 04714ba93f8e3cc24088d108960d0c90678ef86c91e5c41cddc8a52c98fd2c26
  Compiled from "bytecode.java"
public class bytecode
  minor version: 0
  major version: 61
  flags: (0x0021) ACC_PUBLIC, ACC_SUPER
  this_class: #30                         // bytecode
  super_class: #2                         // java/lang/Object
  interfaces: 0, fields: 0, methods: 2, attributes: 1
Constant pool:
   #1 = Methodref          #2.#3          // java/lang/Object."<init>":()V
   #2 = Class              #4             // java/lang/Object
   #3 = NameAndType        #5:#6          // "<init>":()V
   #4 = Utf8               java/lang/Object
   #5 = Utf8               <init>
   #6 = Utf8               ()V
   #7 = String             #8             // 정동교
   #8 = Utf8               정동교
   #9 = Class              #10            // Person
  #10 = Utf8               Person
  #11 = Methodref          #9.#12         // Person."<init>":(Ljava/lang/String;I)V
  #12 = NameAndType        #5:#13         // "<init>":(Ljava/lang/String;I)V
  #13 = Utf8               (Ljava/lang/String;I)V
  #14 = Fieldref           #15.#16        // java/lang/System.out:Ljava/io/PrintStream;
  #15 = Class              #17            // java/lang/System
  #16 = NameAndType        #18:#19        // out:Ljava/io/PrintStream;
  #17 = Utf8               java/lang/System
  #18 = Utf8               out
  #19 = Utf8               Ljava/io/PrintStream;
  #20 = Methodref          #9.#21         // Person.getInfo:()Ljava/lang/String;
  #21 = NameAndType        #22:#23        // getInfo:()Ljava/lang/String;
  #22 = Utf8               getInfo
  #23 = Utf8               ()Ljava/lang/String;
  #24 = Methodref          #25.#26        // java/io/PrintStream.println:(Ljava/lang/String;)V
  #25 = Class              #27            // java/io/PrintStream
  #26 = NameAndType        #28:#29        // println:(Ljava/lang/String;)V
  #27 = Utf8               java/io/PrintStream
  #28 = Utf8               println
  #29 = Utf8               (Ljava/lang/String;)V
  #30 = Class              #31            // bytecode
  #31 = Utf8               bytecode
  #32 = Utf8               Code
  #33 = Utf8               LineNumberTable
  #34 = Utf8               main
  #35 = Utf8               ([Ljava/lang/String;)V
  #36 = Utf8               SourceFile
  #37 = Utf8               bytecode.java
{
  public bytecode();
    descriptor: ()V
    flags: (0x0001) ACC_PUBLIC
    Code:
      stack=1, locals=1, args_size=1
         0: aload_0
         1: invokespecial #1                  // Method java/lang/Object."<init>":()V
         4: return
      LineNumberTable:
        line 1: 0

  public static void main(java.lang.String[]);
    descriptor: ([Ljava/lang/String;)V
    flags: (0x0009) ACC_PUBLIC, ACC_STATIC
    Code:
      stack=4, locals=4, args_size=1
         0: ldc           #7                  // String 정동교
         2: astore_1
         3: bipush        20
         5: istore_2
         6: new           #9                  // class Person
         9: dup
        10: aload_1
        11: iload_2
        12: invokespecial #11                 // Method Person."<init>":(Ljava/lang/String;I)V
        15: astore_3
        16: getstatic     #14                 // Field java/lang/System.out:Ljava/io/PrintStream;
        19: aload_3
        20: invokevirtual #20                 // Method Person.getInfo:()Ljava/lang/String;
        23: invokevirtual #24                 // Method java/io/PrintStream.println:(Ljava/lang/String;)V
        26: return
      LineNumberTable:
        line 3: 0
        line 4: 3
        line 5: 6
        line 6: 16
        line 7: 26
}
SourceFile: "bytecode.java"
전부 이해하는 것은 과하다고 생각해 몇 가지 구성 요소만 살펴보자
Constant pool
위 코드에서 눈에 띄는 부분이다.
Constant pool:
   #1 = Methodref          #2.#3          // java/lang/Object."<init>":()V
   #2 = Class              #4             // java/lang/Object
   #3 = NameAndType        #5:#6          // "<init>":()V
   #4 = Utf8               java/lang/Object
   #5 = Utf8               <init>
   #6 = Utf8               ()V
   #7 = String             #8             // 정동교
   #8 = Utf8               정동교
   #9 = Class              #10            // Person
  #10 = Utf8               Person
  #11 = Methodref          #9.#12         // Person."<init>":(Ljava/lang/String;I)V
  #12 = NameAndType        #5:#13         // "<init>":(Ljava/lang/String;I)V
 ...
자바에서의 String은 Constant pool을 사용한다는 말을 얼핏 들었던 적이 있는데, 정확히 무슨 개념인지 알지 못했다.
Constant pool은 메모리를 효율적으로 이용하기 위해 도입된 것이다. 여기에는 String 변수의 값이 들어간다.

위 그림을 살펴보자. Heap 영역 내에 문자열 상수의 Pool을 가지고, 거기엔 사용자가 정의한 변수가 가지고 있는 값을 담는다.
위 그림에서 Cat이라는 중복된 상수는 하나의 String Pool 주소를 가르키는 것을 볼 수 있다. 객체의 값이 이미 존재한다면 해당 레퍼런스를 참조해 메모리의 사용량을 줄일 수 있게된다.
Instruction Set
말 그대로 명령어의 집합이다.
    Code:
      stack=4, locals=4, args_size=1
         0: ldc           #7                  // String 정동교
         2: astore_1
         3: bipush        20
         5: istore_2
         6: new           #9                  // class Person
         9: dup
        10: aload_1
        11: iload_2
        12: invokespecial #11                 // Method Person."<init>":(Ljava/lang/String;I)V
        15: astore_3
        16: getstatic     #14                 // Field java/lang/System.out:Ljava/io/PrintStream;
        19: aload_3
        20: invokevirtual #20                 // Method Person.getInfo:()Ljava/lang/String;
        23: invokevirtual #24                 // Method java/io/PrintStream.println:(Ljava/lang/String;)V
        26: return
...
컴파일러를 통해 컴파일된 상태이기 때문에, JVM 내에서 동작을 어떻게 해야하는지를 나타내는 명령어를 포함하게 된다.
앞의 0: , 1: 과 같은 숫자는 해당 명령어가 프로그램의 어느 위치에 있는지를 나타낸다. 예를들어 0: 은 idc #7 이 해당 프로그램의 0번째 바이트 위치에 있다는 것을 말한다.
idc, aload, istore 같은 명령어는 OpCode 인데, idc는 상수를 스택에 로드해라. istore는 스택의 값을 로컬 변수에 저장해라는 뜻이다.
뒤의 #7 은 OpCode가 필요한 추가 데이터를 제공하는데, 예를 들어 ldc #7에서 #7은 상수를 의미하는 Operand이다.
그 외의 명령어 정의는 아래에서 확인할 수 있다.
https://docs.oracle.com/javase/specs/jvms/se7/html/jvms-6.html
Chapter 6. The Java Virtual Machine Instruction Set
The wide instruction modifies the behavior of another instruction. It takes one of two formats, depending on the instruction being modified. The first form of the wide instruction modifies one of the instructions iload, fload, aload, lload, dload, istore,
docs.oracle.com
포스팅의 의도는 바이트 코드를 간단히 보여주는 것이었는데 생각보다 어려워진 것 같다. 그냥 이렇게 바이트 코드가 생겼고, 이렇게 JVM에서 동작하는구나 정도로만 이해하면 좋을 것 같다.
참고자료
https://en.wikipedia.org/wiki/List_of_Java_bytecode_instructions
https://docs.oracle.com/javase/specs/jvms/se7/html/jvms-6.html
https://wonit.tistory.com/589#google_vignette